
Cracking open the frosty door to reveal a bag of Costco pierogies is like unlocking a chest filled with culinary treasure.
But how to transform these frozen pockets of potential into a dish that sings with comfort and flavor? That’s the journey we’re about to embark on together.
In my cozy kitchen, where the sizzle of butter meets the golden hues of a perfectly pan-fried pierogi, I’ve honed the alchemy of cooking these Eastern European delights to sheer perfection. And trust me, it’s not just about throwing them in a pot and hoping for the best.
This article will unfold the secrets I’ve gathered over fifteen soul-warming years. You’ll learn to sauté, boil, and even air-fry your way to a meal that’ll have everyone clamoring for seconds.
From traditional pierogi fillings to the best way to reheat pierogies, we’ll cover it all.
So, whether you’re looking to whip up a quick weeknight meal or dive into the art of homemade pierogi dough, stay tuned. Your taste buds—and your dinner guests—will thank you.
How To Cook Costco Pierogies: The Quick Version
To cook Costco pierogies, you have a few options:
- Boiling Method:
- Heat 3-4 quarts of water in a pot to a slow boil.
- Add a teaspoon of salt if desired.
- Place the pierogies in the boiling water, uncovered, for 2 to 3 minutes or until they rise to the top.
- Stir occasionally and then drain. Avoid overcooking to maintain quality.
- Pan-Frying Method:
- Thaw the pierogies for best quality.
- Place them in a skillet with melted butter and 3 to 4 tablespoons of water on low heat.
- Turn occasionally to brown evenly on both sides. Avoid high heat as it can toughen the dough.
- Baking Method:
- Preheat the oven to 400 degrees Fahrenheit.
- Line a baking sheet with parchment paper.
- Place the frozen pierogies in a single layer on the baking sheet.
- Lightly brush each side of the pierogie with melted butter.
- Bake in the oven for about 20 minutes, flipping once at the ten-minute mark.
Preparation Basics
Types of Pierogies Available
When pondering how to cook Costco pierogies, the starting point is always selection.
The frozen section at Costco tempts with an array of pierogi options, each stuffed with tempting fillings like savory potato, rich cheese, hearty meat, or vibrant vegetables. Each variant promises a different palate adventure.
- Frozen pierogies are the go-to; convenient, a quick fix.
- Fresh pierogies, a bit rarer, feel more like grandma’s Sunday kitchen.
But, frozen or fresh, these doughy delights stand ready to absorb any flavors you bestow upon them.
Necessary Kitchen Tools and Ingredients
Before diving into how to cook Costco pierogies, ensure your culinary arsenal is equipped. Rally your spatulas, pots, and pans; they’re about to embark on a mission.
- A large pot for boiling
- Frying pan for that crisp exterior
- Colander for draining
- Tongs or slotted spoon to fish them out of their hot bath
And the co-stars: onions browned to sweetness, sour cream for that creamy zing, maybe even some bacon bits crackling with flavor, all playing their pivotal roles in elevating the humble pierogi.
Cooking Methods

Boiling
Now, to the heart of it, how to cook Costco pierogies in the bubbling cauldron of your pot. It’s simple:
- Water in pot, fiery stove.
- Pierogies dive in, swim until they pop up like buoys.
But steer clear of overcrowding; give them space to dance, or they’ll stick like best pals at a fair.
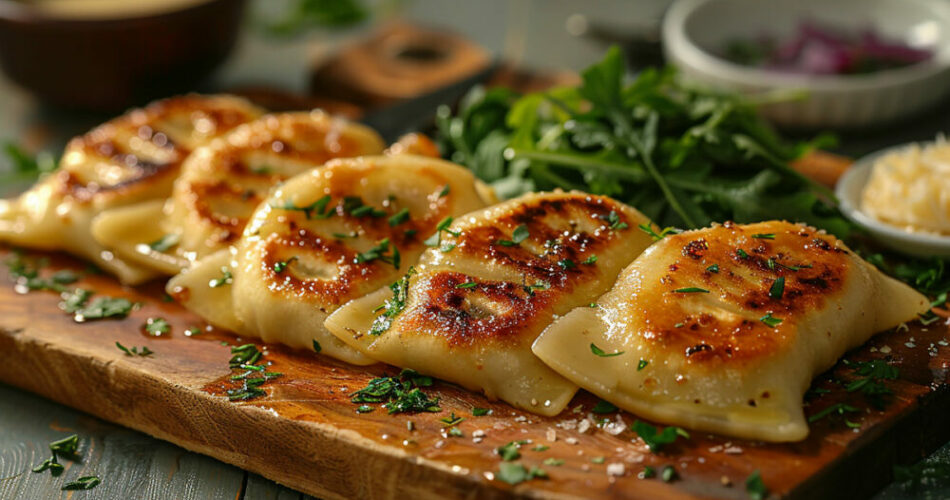
Frying
For those craving a bite that sings with crunch, frying is the route. Medium heat, butter hissing, pierogies laid down gently like precious gifts. Patience, now; let them bronze slowly. They’ll tell you when they’re ready for a flip.
Keep eyes peeled for:
- Overzealous heat – a sure way to a burnt offering
- Shy heat – they’ll soak oil, turning soggy
Baking
An oven’s embrace can be warm and gentle, urging pierogies to a perfect, crispy golden without the heavy oils. Set them on a tray, treat them to a light oil kiss, and into the oven they go. Watch for a crust that snaps with a bite, signaling their readiness.
Alternative Cooking Methods
An air fryer can be a pierogi’s best friend, providing a hug that wraps them in consistent heat, turning them perfectly crunchy. Or take them outside, let a grill’s flame lick them to a smoky perfection.
Flavor Enhancement and Side Dishes
Traditional Polish Serving Suggestions
Embrace the motherland’s tradition—garnish with onions golden as the harvest, invite sour cream to the party, maybe a sprig of dill. It’s a nod to heritage, a bridge to the Old Country, whether it’s a festive day or just Tuesday.
International Influences
Globe-trotting taste? Fold in flavors from afar—maybe a dab of chutney or a brush of hoisin. Adapt the filling to Thai spices, stuff with Tex-Mex vigor. The pierogi is your canvas; your palate, the paint.
Recipe Variations
The world’s changing, and so are diets. Vegan, gluten-free—fear not, for pierogies march proudly into this new world order, adapting, evolving. Get creative with tofu, flirt with gluten-free blends. Gourmet it up with truffle or go earthy with wild mushrooms. Reinvention is, after all, the sincerest form of flattery.
Storage and Reheating
Storing Leftover Pierogies
We cool them down, tuck them in the fridge or nestle them in the freezer—either way, they’re snoozing till their next show. Keep them airtight; they don’t fancy freezer burn.
Reheating Methods
Awaken them with care: oven or stovetop, let the heat welcome them back gently. The microwave? Swift yet sly, wielding steam instead of sizzle. Choose your tools wisely.
Health and Nutritional Considerations
Nutritional Profile of Pierogies
Here, in the realm of dough pockets filled with potato, cheese, or meat, we find hearty fare. They sit well in our bellies and serve up satisfaction. But let’s balance the scales, marry them with greens, and they’ll play nice in the dietary sandbox.
Dietary Restrictions and Allergies
Pluck out the gluten, sidestep dairy; allergens be gone. Markets now cater to the discerning, the restricted. Fear not, for your plate needn’t be barren. Seek, and ye shall find pierogies for all.
Common Challenges and Troubleshooting
Handling Dough and Filling Issues
The dough’s delicate like morning dew; tears are its nemesis. Gentle hands, kind hearts mend its woes. Fillings, too timid or too bold, find equilibrium in measured spices and leveled cups.
Cooking Problems
Oh, the woes of pierogies clumped in unity or glued to the pan. A drizzle of oil, a watchful gaze—prevent the pitfalls. Overt or under, the same applies: vigilance, my dear cooks, is the cornerstone of how to cook Costco pierogies.
FAQ On How To Cook Costco Pierogies
Should I thaw Costco pierogies before cooking?
Absolutely not. Dive right in with them still icy. Straight from the freezer to the pan — that’s the trick. A quick dance over high heat with a splash of oil, and they’ll crisp up beautifully without turning soggy.
It’s the golden rule: cooking from frozen ensures the outside is crisp and the inside, piping hot.
What’s the best way to cook Costco pierogies?
Pan-fry them to golden perfection. A hot skillet, some butter or oil, and a careful flip now and then. That way, you get a mouthful of crispy outside, tender inside. Don’t rush it; let each side develop a nice tan. Remember, pan-frying pierogies is the path to a perfect texture.
Can I boil Costco pierogies instead of frying?
You bet, boiling is a classic. A pot of salted water brought to a gentle boil is your friend here. Toss them in and give them about five minutes.
They float to the surface when they’re ready for a lift out. Boiling gives a tender bite, ideal for those, who prefer softer outside.
Is it possible to cook Costco pierogies in an air fryer?
The air fryer’s a modern twist and, oh boy, does it work. Lightly oil them and pop into the air fryer at 400°F for about 10-12 minutes.
This method, my friends, gets you that coveted crunch with minimal fuss. Air fryer pierogi instructions are game changers for the crunch enthusiasts.
What are some tasty toppings for pierogies from Costco?
Crispy onions, a dollop of sour cream, or a sprinkle of fresh herbs elevate the humble pierogi to a feast.
Don’t skimp on toppings; they’re like the grand finale of a show — that burst of flavor that makes your taste buds dance. Pierogi toppings are key to unlocking an explosion of flavors.
How long do I cook Costco pierogies in the oven?
Let the oven preheat to around 375°F. Spread the pierogies on a baking sheet, give them a little oil brush, and slide them into the oven.
Give them 20 minutes; they should come out crispy on the outside, hot in the middle. Quick, easy, and you’re freed up while the oven does the heavy lifting.
What should I serve with Costco pierogies for dinner?
Pair with tangy sauerkraut or crisp apple salad for a refreshing twist. Or how about a side of sautéed veggies for some color and crunch?
Side dishes for pierogies can be as straightforward or as fancy as you like. They’re flexible like that, happy sidekicks to your pillowy pockets of joy.
Can I microwave Costco pierogies if I’m in a hurry?
Sure, the microwave’s quick but won’t win you the crispy texture. If you’re sprinting through dinner prep, go for it. Just ensure they’re covered to avoid drying out.
A few minutes on high and you’re good to go. Just keep in mind, the results are more steamed than fried.
How do I know when the pierogies are fully cooked?
When frying or boiling, look for a nice color change — they’ll tell you when they’re ready by boasting a golden-brown suntan or by floating to the top of the water, all plump and proud. They’re whispering, “Take me out; I’m perfectly done!”
Are Costco pierogies a healthy dinner option?
Well, they’re hearty, for sure. Packed with carbs and cheese, they’re comforting but might not win a health food award.
However, pair with some greens, go easy on the butter, and they can snuggle right into a balanced meal. Like many good things, moderation is key.
Conclusion
Wrapping up our culinary escapade on how to cook Costco pierogies, we’ve navigated the sizzling skillets and steamy pots, unveiling my cozy secrets to transforming a simple bag of frozen goodness into a feast that sings with each bite.
There’s magic in these doughy delights, a comfort woven into their very essence, whether they’re crisped to perfection or boiled to a tender hug. It’s not just about filling our bellies; it’s about crafting those soul-soothing meals that beckon for seconds.
With a sprinkle of creativity and a dollop of love, you’re set to turn any evening into a petite celebration. Ladle on your favorite pierogi sauce ideas or heap on those flavorful pierogi toppings. Yet, the real joy? It’s in the shared smiles as folks gather ’round your table, while the humble pierogi, in all its golden glory, takes center stage.